10. 板子姿态检测
这个模块可以让你获得板子当前的九轴姿态,分别是加速度、重力、磁感应的(X、Y)的方向状态值。
最基本的功能是获取它们当前的 X、Y、Z 三轴的值来判断板子此时的运动状态,比如说,加速度 Z 值由小增大,表示 Z 轴方向上有在移动(有了加速度),所以可以判断出板子在移动,移动的方向在 Z 轴之上。
10.1. 先体验试一试
经过了简单的介绍,我可以设计一个简单的判断,例如 获取板子的平衡情况,以 accelerometer 加速度模块为例,获取它的 X 轴的值,即可得到一个基本的数值,如果数值大于 20 说明它向右偏了,如果小于 20 则说明它向左偏了,如果在这两者之间,则说明它是平衡的,所以有如下的代码,显示 L 表示向左偏,而显示 R 表示板子向右偏了,试试吧!
from microbit import *

while True:
    reading = accelerometer.get_x()
    if reading > 20:
        display.show("R")
    elif reading < -20:
        display.show("L")
    else:
        display.show("-")
效果如下:
10.2. 反馈板子姿态
姿态检测,例如上下左右左右,前进后退摇晃自由落地等,如下代码就是,当板子面向上的时候显示笑脸,面向下的则是显示生气的表情。
from microbit import *

while True:
    gesture = accelerometer.current_gesture()
    if gesture == "face up":
        display.show(Image.HAPPY)
    else:
        display.show(Image.ANGRY)
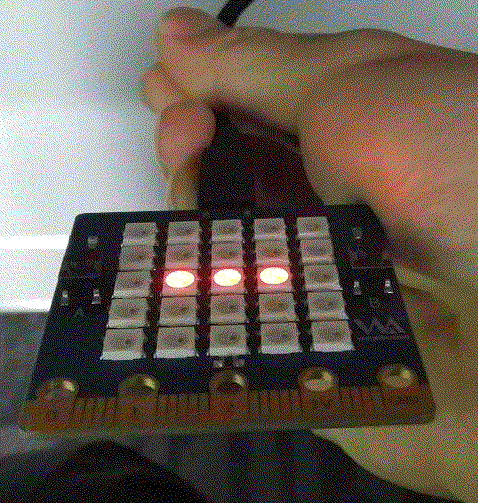
10.3. 体验平衡球游戏
提示
代码过于复杂,直接粘贴运行体验即可。
基于先前的基础运用,我们就可以做出一个趣味的平衡球游戏。
import utime
from random import randint
from machine import I2C, Pin
from mpu9250 import MPU9250

i2c = I2C(scl=Pin(22), sda=Pin(21), freq=200000)
sensor = MPU9250(i2c)
print("MPU9250 id: " + hex(sensor.whoami))
from display import Pixel, PixelPower

PixelPower(True)
View = Pixel()
X, Y, Color, Flag = 2, 2, 2, 0
while True:
    # print('acceleration:', sensor.acceleration)
    # print('gyro:', sensor.gyro)
    # print('magnetic:', sensor.magnetic)
    A = sensor.acceleration  # -1 and -2 Software correction
    View.LoadXY(X, Y, (0, 0, 0), False)
    if (A[1] > -1 and A[1] > X and X < View.Max - 1):
        X = X + 1
    elif (A[1] < -1 and A[1] < X and X > View.Min):
        X = X - 1
    if (A[0] > -2 and A[0] > Y and Y > View.Min):
        Y = Y - 1
    elif (A[0] < -2 and A[0] < Y and Y < View.Max - 1):
        Y = Y + 1

    Color = Color + Flag
    if (Color == 10):
        Flag = -2
    elif (Color == 2):
        Flag = +2

    View.LoadXY(X, Y, (0, Color, Color), False)
    View.Show()
    utime.sleep_ms(100)
